
In our Garage!
Halloween 2007 is fast approaching, and my fiance’ and I have always really enjoyed making large elaborate Halloween props and parties. Until we moved recently, we had always lived in an apartment. This is our first Halloween together that we have an entire yard to decorate and a garage to work on large projects.
Even though Halloween is almost here, we decided to take on a rather large challenge. We’re making a life-size headless horseman and rearing horse! We searched the internet before beginning this project for tips or ideas from other people who had pages about similar projects. We really didn’t find too much about making this specific thing. A few horsemen, a couple of people who made horses jumping out of trees from the Tim Burton Sleepy Hollow movie, but nothing quite what we were looking for.
This being the case, we have decided to add our on-going Halloween projects to the vast category of Halloween prop building and decorating sites on the internet! When he is done the horseman will be pointing at passing cars ready to throw a “flaming” pumpkin as his horse rears up with red glowing eyes and smoke from his nostrils.
At this point, everything is still a work in progress. We’ll keep you posted as we work on things. We’d love to hear any comments or suggestions!
Check out what we’re doing for Halloween 2008!

The Headless Horseman and his Faithful Steed
Day 1 – Michael was really the visionary behind all of this. He started with a pile of wood and created this:

(This is the base to support the horse structure from behind, it will be hidden by bushes. The neck triangle at the top has been removed; the neck and head will need to be built outside because of the height. – Michael)
I still wasn’t convinced that this would end up as a horse. I was completely wrong and should have had more faith!
Day 2 – The next night, I was sewing and Michael was working on the horse in the garage. When I came out, my doubts were all cast aside. Even though there wasn’t much there, it most definitely looked like a horse to me.

(The wire frame is made from heavy gauge chicken fencing which was nailed to the support beam, and tied together with short lengths of stiff wire. For sturdiness I used screws rather than nails to connect the leg frames together. I tried to make the rear legs a bit bowlegged like a rearing horse would. The length measurements were calculated using a photo of an actual horse. Notice the neck support is now gone. -M)
I made a head out of chicken wire that night. It kind of looks a little fat but I want to have the neck ready before I change too much about it. It won’t look right until it’s on the body.
(It’s biiiiig. Heh heh. But it looks really good. We plan to run wires and tubing from behind the horse so smoke can come out of the nostrils from time to time and the eyes will glow red.)
Day 3 – October 2nd, we went shopping to pick up a few things we’ll need for this project. We got a thrift store shirt for the horseman, a light-up plastic Jack-O-Lantern for the Horseman to “throw” at passing cars, the ingredients to mix up some Monster Mud. (Home Depot had some nice ‘Oops Paint’ that was inexpensive. We also went to Radio Shack and got some nice red lights and a few things for a ‘tombstones which flash in time to music’ project we will explain later. Radio Shack = expensive!) This will be our first experience with Monster Mud. Hopefully, it will end up a pleasant one. To learn more about Monster Mud, click here: Terror Syndicate.
We worked for a few hours. Michael was working on the horse and I was working on the Horseman. Here is tonight’s progress.

![]()

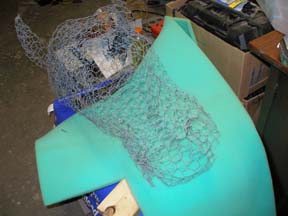
(Lacey made the collar out of the heavy guage fencing so we can tie a cape to it later. We’re hoping to be able to make the cape move using a fan or something, but that might be too ambitious for this year. The pumpkin looks very much like the scarecrow at the beginning of Tim Burton’s Sleepy Hollow, albeit much smaller; we got it at Home Depot. I may try to rig it to flicker like a candle, or just put a flicker bulb in it although they aren’t very bright.)
(For the legs, I used lighter gauge chicken fencing which was easy to mold by hand. I used several smaller strips and worked in sections. This stuff really scrapes you up and makes your hands rough and dry. I recommend gloves and eye protection when using it, it gets caught on things easily and when it comes loose it could snap right at you. The front hooves may not be sturdy enough, but I’ll put a wire coat hanger in them if necessary. Originally I thought it’d be nice to make the hooves move, but that’s too much for this year. The burlap is simply to get an idea of the shape and to see if the horse will look smooth or if the chicken wire pattern will show through. Many people recommend burlap for Monster Mud, so ultimately I will probably use wire to tie the burlap to the frame, and use thinner material for the hooves and head. Terror Syndicate suggested we dip our fabric in latex paint instead of using Monster Mud due to the weight issue, but we haven’t decided yet.)

(The rear hooves probably won’t even be seen, but I’ll make them anyway. I wanted the horse to have big, knobby joints like in the Disney movie. I only finished one hoof tonight because I ran out of fencing. Notice the toy horses we’re using for reference as well.)
Tomorrow we’re off and hope to get plenty of work done to get these guys outside scaring people as soon as possible!
Day 4 – The Horse moves outdoors!
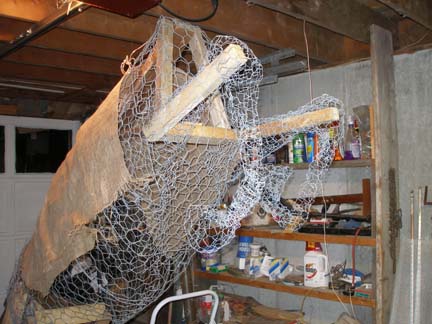
Today we had to move our horse out of the garage because he’s just too tall to work on indoors any longer. His head has been attached to the body and a brace has been made to set the horseman on. Today’s bit of construction was mostly done with random pieces of wood again and more and more and more chicken wire. Hopefully it will stand up to the weight of the monster mud. We’re crossing our fingers and hoping for the best. (It already tips forward easily, it will need additional weight support in the back. I also think we will need to move it to it’s final position before coating it with anything.)


(The head is just right! A little wide, perhaps, but it works. I might give him a more pronounced belly and backside; compared to horses I see while driving around, this guy looks starved!)
Here’s Michael working hard on the horse’s neck!

(Yes I have a goatee now! Just for Lace though because it’s a pain in the “back end of horse”!)

Day 5 –October 9, 2007. Michael here… For the rest of this post it will prolly be me writing, but we will switch back and forth and likely make little attempt to explain which of us is writing, so I apologize in advance. I also know prolly isn’t a word but it should be!
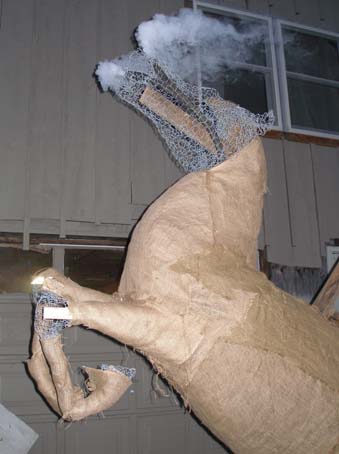
Sorry we didn’t post yesterday, it’s been so busy here! Have we really only been working on this thing for 5 days?!? October is almost half over! We finished the wire work and covered the body and part of the legs with burlap. I spent a huge amount of time rigging the nostrils to blow fog from a fog machine; that was neat. (HINT: If you want something to blow smoke, figure that part out first, then build the thing around the smoke rig!)

Unfortunately, since then it has been raining for two days straight and we haven’t been able to get anything more done, and I’m getting anxious. I’ve put a plastic tent around him in hopes that he’ll dry off enough to work on. We bought red and yellow colored flood lights to put behind him at Lowe’s and I can’t wait to see how they look. I was going to use our fog machine to blanket our ‘cemetary’ in fog (where the tricks and treats will be) and then use a little battery-powered computer fan to steal some of the ground fog and blow it up into the horse, but I’m not sure if it’ll work. I suspect I would need a fog machine dedicated to the horse to make the smoke from the nostrils. It’s only an experiment. OH! And how hard is it to find Fog Juice in NH?! I had to order some on the internet, because all the fog juice was recalled from Wal-Mart, and I’m very curious to know why… (update 10/22 – Wal-Mart has fog juice back in stock!)
Day 6 –October 12, 2007 – Michael again… Today I tilted the horse forward and carefully brought him back inside, propping him so he would be leaning to fit in the garage. Once he dried Lace and I covered him in a first coat of the monster mud, which was really fun. He kinda looks like chocolate mousse! But not as yummy. The burlap suffered a bit from the rain, it stretched and is baggy on the tummy. No pictures tonight, we’ll take some tomorrow after his second coat. Hopefully his eyes will be wired and working as well!
Day 7 – October 13, 2007 – Michael again- I have monster mud in my hair. In fact, it’s kind of all over me… The horse needs a wee bit more mud and more sculpting around the face. I’m happy to say it seems one tub of monster mud will be sufficient, although not particularly thick or hard. He may be a little rough around the edges, but I keep reminding myself it will be on a hill, and we can always do more for him for next year.
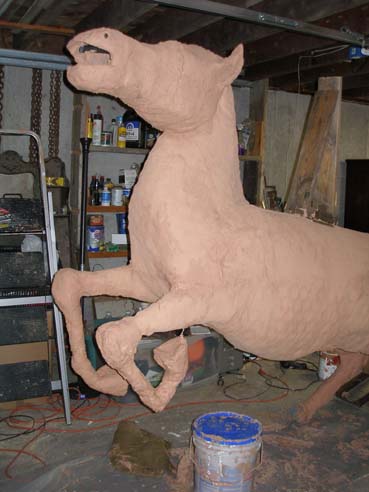
I had to tie the left hoof to the body because of the weight, the rear hooves were removed in order to get him in the garage at an angle. I might put them back later (they won’t be seen in the tall grass). The mouth and nose obviously need work. I know it doesn’t look like it, but from the front he looks a lot like Uncle Deadly from the Muppets!
Day 8 – 10/14 – Lace worked on the face some more while I wired the eyes. They look really nice with both attached to a 9 volt battery, though they say 12 volts. We tested the smoke effect again and it looks good. Tomorrow we will have time to bring him outside and finish him (except for painting him black) while the sun is still up! I’m very excited!
Day 9 –10/16/07 – Today I brought the horse back outside and applied final touches of monster mud. It isn’t perfect but for our purposes it’ll do. I put the horseman back up and gave him legs and boots, it might need tweaking but I think he’s more or less ready. Just need to fix the collar, paint him black, and add a cape. Them move him… The horse is surprisingly tough with only one coat of mud. I’m not sure what to do about lighting, the light fixtures I bought are el cheap-o. One fell apart just screwing the bulb in, but I secured it and it’ll be safe for outdoor use. The lighting doesn’t show the horseman well, and I’m thinking once the horse is painted black or dark brown, it might not show up. Not sure what I’m going to do, but you’ll find out soon enough! (And I need to get a picture of Lacey working on the horse up here, but she’s being difficult!)

(Yes the headless Hessian prefers to ride bareback! Maybe next year we’ll get him a saddle…)
Days 10, 11, 12 –October 17, 18, 19 – Getting home from work and it’s already dusk has made it difficult to do much. I bought some cheap $2 ‘Now’ spray paint (because latex paint cost $25 a gallon) and sprayed the horse black. It took two and a half cans to paint half the horse, then my dad surprised me and painted the other half himself using one can of $4 Krylon paint. My father’s side looks much better than mine. Lesson learned: don’t buy cheap spray paint! Today Lacey put a nice red cape on him and took a video with her cell phone:

We are now ready to put him out by the road, but it was too dark and rainy tonight to do it. Tomorrow afternoon, weather permitting, he should be out! Then when I get home from work we can do the lighting! Tonight we are working on the scarecrow and hope to have him on display tomorrow afternoon as well. (Hopefully no one steals or defaces either of them…)
The Horseman is out and he’s looking for a top to swap!

(finally got Lacey up here on this blog thingy!)
Day 13 –October 20 – Fortunately, the Headless Horseman is deathly afraid of spray paint so Lacey is safe. We’re just putting the finishing touches on him and tonight we’ll set up all of the lights around him. (Michael: Moving him was about as difficult as I anticipated, he’s wet from the rain and very heavy, it took three people. Lacey held the back down so he wouldn’t fall over, my dad and I lifted the middle. Yes, we were pulling it up, Lacey was pushing it down. The need for a better design is clear, no? We nailed a board across the support and removed it when everything was in place. I should have designed him with a way to insert a pole horizontally, like the Lost Ark in Raiders of the Aformentioned Ark, and a pole that would go up into the chest in front temporarily to push him up when moving him.)
Here is another picture from the side that isn’t the “beauty” side. We’ll post more tonight!

(Michael: I’m such a big dork. When I came home, actually seeing the horseman made me so happy! So tonight I spent a good two hours setting up the lights. A van pulled up and someone in the dark said “We’re just checking out the headless horseman!” (Thanks!) Most people drive through so fast (too fast) and prolly don’t even see it. I’m kind of disappointed in the lighting. The yellow flood light doesn’t work anymore for whatever reason, and the el-cheapo light fixtures are actually super el-cheapo. I couldn’t even remove the bulb because turning it turned the entire fixture inside, and I had to take it apart! Tomorrow Lace and I are going to finish the scarecrow and change the lighting. The horseman needs a bright spot in front and at least one more in back, prolly to backlight him as Mike suggested in the comments. I’m trying to light as much of the trees and horseman as possible without ticking off the neighbors and blinding cars. : ) He’ll only be lit from dusk till maybe ten pm at the latest.)

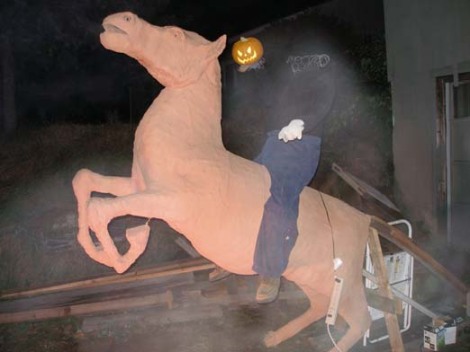
(“You! Ya ha ha ha!” Notice the horse’s red glowing eyes! This was the test, and it’s a timed-exposure so it’s significantly brighter than real life. I realize people will be driving by with their headlights on, but I’d like it to be a little better than this. I’m a perfectionist as is Lacey, and though it’s far from perfect, we’re happy overall and can move on to the next projects.)
10/21 – Today we finished the scarecrow and put him out, and tonight we finished lighting the horseman:

Some changes and notes: We added a fan, lying down, right under the back legs. We secured the cape to the base so it’ll flutter with the fan. The smoke machine is set on 5 second bursts every 30 seconds. I wired the eye lights to a 9 volt phone charger, and they’re much brighter than when attached to a 9 volt battery. I took an old window, added wooden stakes to the corners, and placed it over the spotlights so that even if it rains we can have them on.
I’m really happy with the way it looks. When I went down to take this picture, pitch black out and me holding only a flashlight and my camera, I got to the bottom of the driveway and there’s a man standing there! Scared the heck out of me! It was our neighbors, taking pictures of the horseman. Very nice couple, they aren’t normally scary, as far as I know… Heh.. heh… And a truck pulled over and a couple asked me about the horse. It’s great that he’s getting attention!
______________The Scarecrow______________

Our scarecrow is loosely based on the one at the beginning of Tim Burton’s Sleepy Hollow (for the body) crossed with Jack Skellington’s Pumpkin King scarecrow outfit from the beginning of The Nightmare Before Christmas (for the head.) The head is a Funkins Carvable Pumpkin purchased at Joanne’s Fabric. We used a wonderful pattern for the Pumpkin King which we found at the Zombie Pumpkins site (click here for the site. They also have a nice Headless Horseman pattern.) Inside the head, we stuck a Funkins Pumpkin Light. (The light was totally too expensive for what it is. It flickers like a real flame, but it’s very very dim. I actually kind of like the look though because it’s a cold, feable, unfriendly light inside and makes it a bit scarier. Unfortunately it must be absolutely dark and you can’t be more than a couple feet away to see it.) The body is made from PVC piping painted black and wrapped in burlap. We cut grooves in the pipe and tied twigs and sticks to it for the ‘ribcage.’ We then draped some old gauze and burlap over the arms (for those of you who went to our Mummy Party, this guaze is all that’s left of the mummy) and hot-glued it in place. We dirtied it up with leaves and stuff, and glued straw around the neck. We added long branches for hands and secured the head with hot glue so it can’t be stolen. (Riiiight.) It was really easy and looks great! The only expensive part was the Funkins stuff. Then I drilled a hole in a flashlight, soldered on an old 3.5v Nokia cell phone charger, and stuck it at the base shining up at the gauze. Nice and creepy!
10/22 Update – Today the scarecrow was lying down on the job! The aluminum pole I had put in the ground and slid the PVC pipe over had broken right at the base. I thought, that must have been some pretty tough wind to break an aluminum pole in half. While attaching the scarecrow to a new pole so it won’t spin around, two dump trucks passed by, and I found out why the pole had broken. Now, the speed limit through here is 35. I don’t expect that anyone actually goes 35, but these trucks were going much too fast. The scarecrow violently jerked backwards and if I had not been there, I’d have another broken pole. So I put a second pole behind the scarecrow and tied it to the PVC pipe so that if he gets hit with a blow like that again, the second pole will hopefully prevent him from toppling. So far, it’s worked well!
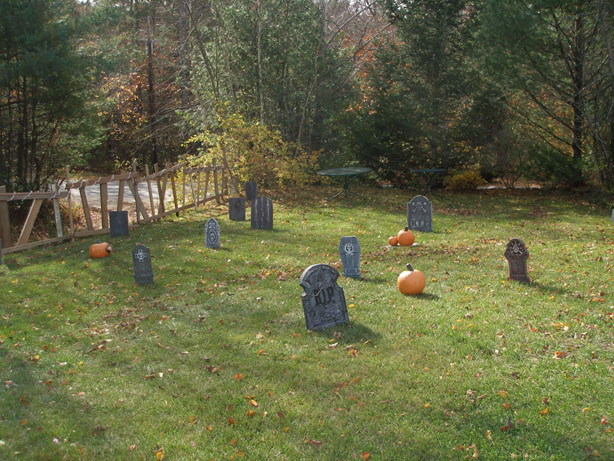
______________The Cemetery______________
10/23 – Tonight I spent a couple hours matching up boards, and now we have the beginnings of a crooked old fence. It will serve two purposes, to be kinda spooky and run-down looking, and to prevent any trick-or-treaters who might show up from going into the driveway. We were planning to build a wrought-iron looking fence out of PVC piping and wood, you can find similar projects on the MonsterList of Halloween Projects website. (click for the list!) We opted for the wooden fence instead because of sturdiness and inexpence. The wooden fence won’t fall over if bumped into, not that a well-built PVC fence would fall over either, and wood was readily available, PVC was not.
We bought a few foam tombstones from Wal-Mart and will use dowels or rods to put them in the ground. We are going to use some old stone shingles with wooden stakes screwed to them to fill in as extra tombstones.
We have a Gemmy Ground-Fogger (also from Wal-Mart) and with only minimal testing I think it’ll be good for the cemetery. (See below for my final report on this.) There’s a compartment in the front where you put ice which chills the fog before it comes out of the machine so that it will hug the ground instead of fill the air. (If you have a regular fog machine and want to make it a ground fogger, check out the many “fog chiller” ideas on the MonsterList. I built one using a plastic cooler and directions from the list and it worked beautifully, and the ice lasted all night without needing refilling.) I’ve used both Gemmy (Wal-Mart) and American DJ fog juice and they are both good. I doubt there’s a huge difference in fog juices, but this is my experience.
Music and sound effects are easy; a portable CD player with detachable speakers. If I get really ambitious I could make a CD with music on the right speaker and sound effects on the left speaker and set them at opposite ends of the cemetery. Or to save time and headaches I could just borrow a player!
We had planned to build a small mausoleum to hide a Commodore Vic-20 or 128 for a light show project, but it’s on hold till next year. There’s only seven days left and the programming and wiring of lights is time-consuming. We want to place small lights in front of eight of the tombstones, or Christmas lights in pumpkins, or whatever, and have them ‘flash’ to a song. They would be connected to the Commodore computer’s User Port (it’s similar to a PC’s parallel port). The computer would be hidden inside the mausoleum, protected from the spectator’s view, the elements, and small fingers. I’ve already used this set up to control props, lighting, and music in the past, so the theory is sound, but the programming’s a hassle. It’d be fun to try another year, or maybe for a Christmas display!
10/26 – Oddly, indoors, the ground-fogger worked fine. Outside in the cooler air, it did not. The fog coming out went straight up, and the ice was gone in almost half an hour. It’ll need more testing, but if it doesn’t work for ground fog, there’s no easy way to adapt it to be a regular fog machine for the horse or for use with an external fog chiller. I tried it again inside and it worked fine, so I suspect any amount of air current will take the fog away. Also I think it helps if it is right on the ground, not on a crate or anything. Hopefully we can set it in one corner or our ‘cemetery’ and let the wind take it across the yard.
The fence is complete, and when we decide how to set up all the props we’ve collected over the years, we’ll post a photo!
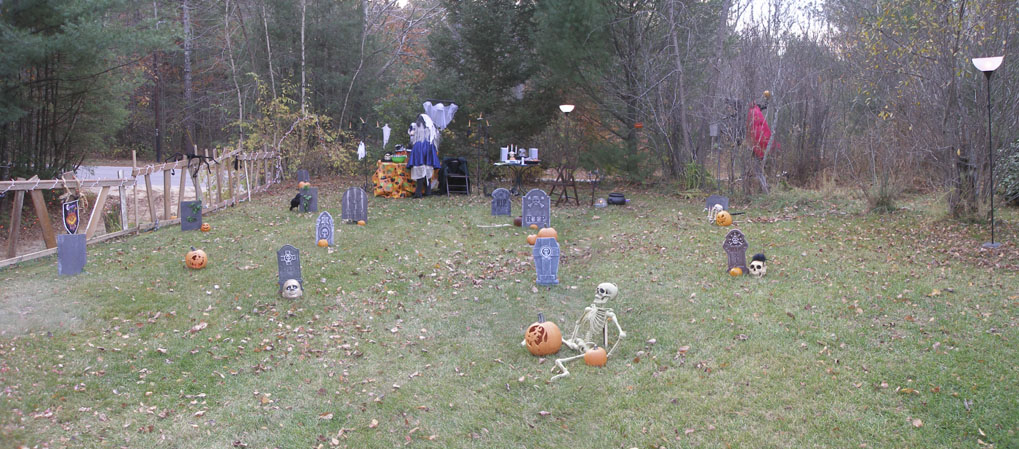
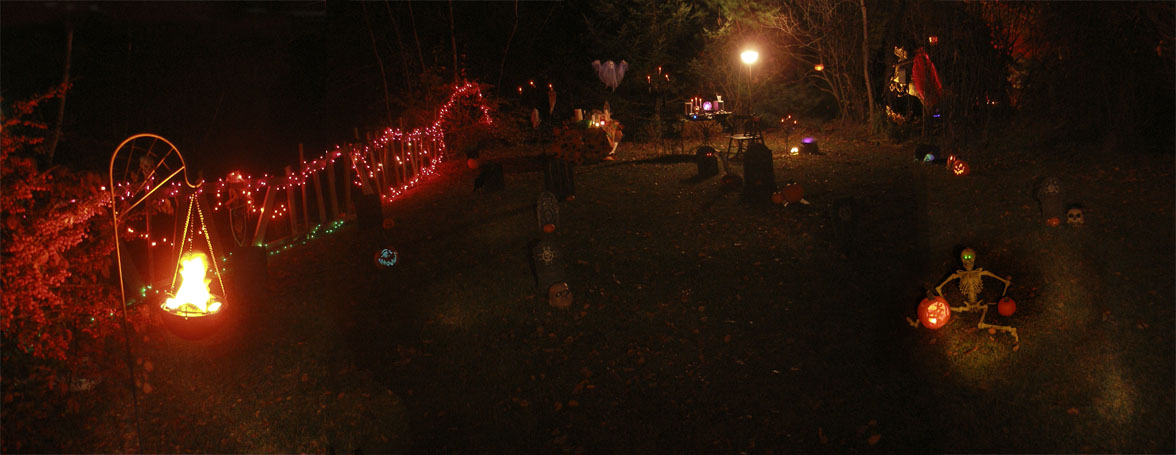
10/31 – We decorated the fence with red, green, orange and purple christmas lights, put several hanging props on it, as well as ghosts in the trees, and pumkins, props, flowers and vines in front of the gravestones, fairly simple, but nice. The pictures make it look sparse but it was nice. I made a CD of Halloween-atmosphere sounds that come from a certain theme park, and on one of the speakers I added the Headless Horseman’s laugh from the Disney cartoon every three minutes or so. That speaker went in the bushes in front of the horseman, the other speaker went in the bushes near our cemetery. We had two tables set up with candy and props on one, a CD player for music on the other. We also had two beautiful wrought-iron candelabras we purchased from Property Control (best buy ever!) which had been used in a Disney Cruise Line show called C’est Magique (anybody know anything about this show?) We put out three torchiere floor lamps with colored lighting to light up our cemetery but later switched to brighter lights when the first Trick-or-Treaters said they couldn’t see.
The fog machine: I love Gemmy’s fog machines, the ones sold at Wal-Mart. The regular ones are inexpensive, they take a beating, and they don’t die if they run out of juice and are left on for a short while. However, the ground fogger was very disappointing. The ice needed replacing every ten minutes, and as the fog gets pushed through the ice compartment first, the inside of the fogger gets sticky and nasty very quickly. I suspect at least 50% of the juice recondensed and ended up in the bottom of the fogger, then probably on the ground, which while considered non-toxic, is actually probably not healthy for animals and plants. Next time I will just use a regular machine and direct the fog through a chiller like the one I mentioned above. The home-made chiller results in much better ground fog, lasts hours, and isn’t messy. (Directions for the home-made chiller.)
Click these 3 photos for full panoramic shots:


______________________________
Halloween Night:
Well, Halloween is over, and we had fun. We started decorating the cemetery at about 1:30 in the afternoon using props and decorations we’ve collected over the years, we were pretty much done by 3:30.
Me and Lace in costume; Lacey in her American McGee’s Alice dress with a little goth added, me in my replica Haunted Mansion Host outfit: (Incidentally Lacey makes most of our costumes herself!)


Trick-or-Treating was from 5-7 pm, so just to be safe, we were out from 4-8 pm. We had treats, hot apple cider to keep us warm, and some fun Halloween tunes. Lots of people stopped to check out the horseman and take photos, and we got many compliments! It was fun to see everyone’s enthusiasm! Our neighbor came over to see our setup (this time he didn’t scare us so much!)

We had a total of 8 Trick-or-Treaters in three groups. We tried to get photos of the ToTs, but our camera died every time they came (must’ve been ghosts sucking energy from the batteries.) However my brother-in-law Kevin got some pictures, as well as my cousin Trisha with her kids:


Although we’d hoped to have more ToTs, it was a lot of fun. We kind of expected only a few since there hasn’t been much going on here during Halloween for… well, a few years. From what I understand these things only grow if you keep them up, and maybe next year we’ll do something a little bigger and advertise, or get involved with someone else’s project. Money is a big factor in building walk-throughs and hayrides, as well as insurance concerns in a sue-happy world, but we might be game. We’ve already got some unrealistic ideas we’ll share next year! (PS. We almost put a head in the horseman’s hand for November 1st, but decided it might not be as funny to other people.)
Where’re we going to store this thing? Anyone looking to buy a life-sized horse?
10/23– We have our first fanpic! Well ok it’s from my Aunt, but she’s a fan too. Two-headed scarecrow anyone?

11/1 – We made the Granite State News!

Thursday, November 1, 2007 “Beware all who pass – Creative enthusiasts of the spookiest of all holidays brought Halloween decorations to a new level this year in Tuftonboro. This headless horseman threatens to throw a “flaming” pumpkin head at all passing cars on Sodom Road from his rearing horse, with red glowing eyes and smoking nostrils.” Pic by Joshua Spaulding.
______________________________
3/28/08

We won a contest at ZombiePumpkins.com! Click the link above to visit their page.
______________________________
Comments, Questions, Suggestions?
Click here to leave us a comment and read other people’s comments!
____________________________________________________________________
Visit Michael and Lacey’s other sites!
– Halloween 2008 – The Monster Motel opens for business!

– The Toy Shop – 20 Marvelous Mechanical Models That Really Work! – Twenty paper models and automata that you can decorate and print, from the original Commodore 64 program! Also a Snooper Troops SnoopMobile model can be found here!

– Paper Models – The Christmas Kit – more paper modeling with old computers! A Dickens Christmas Village, A Holiday Locomotive, creative ornaments and gift packaging, just in time for the holidays!
– Commodore 64 Logo, Computereyes, Odell Woods, and more – Some random stuff, including Commodore 64 Terrapin Logo programming software, Odell Lake and Odell Woods, Star Wars stuff, and more.

OMG! It’s looking so awesome. You have to take video of it too when you’re done. I wish I was there so I could see it in person (and help). 🙂
Wow, it looks really good. It seems to be coming together fast (probably from long hours working on it each day).
Also, welcome to the world of WordPress.
The Headless Horseman has been sighted… at Eye Care
Read this, it’s quite interesting:
“I recommend gloves and eye protection when using this stuff, it can get caught on things easily and when it comes loose it could snap right at you. I’m a little worried the front hooves may not be sturdy enough, but I’ll put a wire coat…”
Haha– Michael has a beard. That’s amusing to me. Yeah–you need to definitely feed that horse more hay or something. Of course he is a demon-horse so… make sure it’s demon-hay.
Wwwwooowwww! Look what you guys can do with some space, ha! Looks terrific. I am especially impressed with the hoofs and head! I am excited to see the finished horse and rider!!! Don’t have it on road with a curve or embankment . . . folks may drive off the road, lol!!! Keep up the excellent work! P.S. I like the beard! : )
Yeah… this is sounding really cool, but you should make a NEW post every time you write… that’s sort of the idea. And then it’s easier for people to determine when you’ve updated the blog.
I wish I were there with you guys; it sounds like so much fun.
I asked Evie if she wanted a halloween costume and she said, “I’m already a cat.” I couldn’t argue.
Sorry about not making new posts each time, we wanted new entries to appear at the bottom, and this was the only way we could think to do it. Perhaps a blog isn’t the best forum for this project, but we like the features.
Awesome project, My children and I are appreciating your efforts. We thought we had an extreme appreciation for all hallows Eve. Such a great holiday no pressures no gifts just imagination. When we as adults can enjoy our childhood side. Please keep up the great work and best of luck with the finished project. We have no doubt on your success.
We keep striving ahead a little at a time, your comment is much appreciated! Always good to hear from other Halloween enthusiasts!
If you wanted to do new posts and have them post below the others, you could back date them.
The issue with this, though, is that after a while, the posts wouldn’t all fit on one page (i.e. the older posts would go to the archive). So, it wouldn’t really help.
The issue with the lighting appears to be the positioning. The horse is blocking all the light from getting to the horseman. I’d suggest maybe adding a second to the side behind the horse (from how you took the picture). This would help backlight the horseman and give him better definition (i.e. a dark object will show better on a light background than a dark background).
Also, on a side note, I’m not sure on how you have the horse nostril fog set-up, but I would suggest adding a timer to the mix. That was the horse would only snort smoke once each 5 minutes (or however you wanted to set it up).
Lastly, that picture of the completed set up and night with the flash on looks ghostly (there’s like a fog/mist messing with the image). Pretty spooky effect.
Hey guys ~
This project looks awesome. Can you give me directions from say Hannaford in Ossipee? I would love to get the full effect one night. My husband wants to know where you are going to store this thing for next year???
Squeeeeeeeeeeeee! 🙂
::Squeak opens one eye drowsily:: Hmm? Was that directed at me?
Heya! Can you give me driving directions from Florida? Thanks…. 😉
You did a fine job on your Headless Horseman – Love it. I’m a huge fan of the story/movie. Keep up the great work and I look forward to seeing more from you guys in the future.
Steve
http://thelegendofsleepyhollow.spaces.live.com/
Truly impressive! You know you’re gonna have to keep that thing in the garage from now on, right? 🙂
Hi Guys! Re: your outdoor fog problem. From our weather experience. Real fog (not knowing if what you are creating is temperature affected?) forms when the temperature and dew point are within 4 degrees of each other. Those fractions of degrees can mean all or nothing with real fog. If that info helps at all.
As I was googling around I cam across this info re: fogger machines. Thought I would pass it along too. Good luck! This was stated about a very high output fogger – suitable even for outdoor applications. (Indoors, a 15 second burst of fog will last for several minutes, but outdoors the fog keeps blowing away so you have to keep making more. Therefore, more power is required for outdoor fogging than for indoor.) Mom
Lacey,
This looks amazing…you both have sooo much talent. I am in awe of the whole project! WOW! I bet it’s so nice to see the finishing project after taking allot of time to build it…? I wish I could come and see it…Amazing!! -Erica
Is it my imagination or is the picture from the newspaper the first time we see a sword on a hilt for the horseman?
Sword? Where? Oh my gosh! We decided it’d be easier for the horseman to get a head if he had a sword! It was added after and we forgot to mention it, sorry!
I stumbled across your site while looking for inspiration for my own “Sleep Hollow” themed haunt. It’s one of my favorite movies and you did an awesome job on your haunt. Always good to see that the spirit of Halloween is alive and well.
Yeah… it probably would be easier. All that bone and whatnot…
Hey guys im an avid halloween junkie and i have to say i stumbled across your web site, I Have to say anyone that makes a hoarse from scratch you have both have my upmost respect!!! A job well done to the 2 of you and when I see these things I always must dtop a note really nice wirk here….
you can see my work on kickthefog.com and look at the pics of flying crank ghosts and you will see the pic that is marked under Glenn Kaestner if you need some more creepier ideas for following years.
Do u have an audio track of the laugh of the headless horseman?
The audio we used was lifted straight from the DVD, so there’s a musical flourish almost overpowering the horseman’s cackle. I wouldn’t be surprised if Disney has reused the original sound byte in other movies or TV shows, so it might be clean elsewhere. We mixed it on CD so that it repeats every 3 minutes or so on one speaker and has a continuous track of spooky sounds from various sources on the other speaker.
Wow, The headless horseman is the single greatest prop I think I have ever saw. I have seen so many props in my time but that takes the cake. Keep up the good work.
Big fan of Sleepy Hollow & used to watch the Disney version all the time when I was young. Very cool and detailed job. I also noticed there are other websites selling life size replicas from $4k-$20k. It might even be a good idea to go into business selling some of your creations. You can sell lower and corner the market:>) Anyway, thanks for the post, and Happy Halloween to you this year. Friday the 13th is coming up this week, watch out for the J-man!
Great Job! We did the same thing starting in 2001. My wifes fav movie is Sleepy Hollow. We built the scarecrow the first year and a couple of years later she bought a rearing fiberglass horse for ou horseman. But to beat all she bought the original Headless horseman costume from the movie along with the riding dress.
We plan to build the tree of the dead on our farm and place the horse and scarecrow by it all year long. We really love that movie. Good luck with your next project.
Hello Lacey and Michael;
Stumbled on your blog while checkin’ out the Zombie Pumpkin site.
First: I soooo wish you were MY neighbors!
Second: You two are wickedly creative!
Third: THANK YOU for being cool and sharing your how-ya-did-it on your blog!
Fourth: Can’t wait to see what your two creative minds
make next!
YOU TWO FREAKIN’ ROCK!!!!!!!!!!!!!!!!!!!!!!!!!!!!!
Have an awesome Halloween 2008 and beyond,
Thanks again;
Melissa (the Halloween Amateur)
Wow, thank you all for the great comments! We’re already working on our 2008 project, but it’s not quite ready for blogging! We’ll add a link to this page once we get plans finalized!
will u ever sell your headless horesman? and if you do how much will you sell for it also were is it located i would love to see it
Ok what in the world are you guys doing out there!?! Wow I am seriously impressed!! May I mention your art work in an upcoming Disney Fan Tailagram? What do you have in store for 2008??
Just wanted to say that I LOVE that headless horseman theme.One of my favorite movies and I adore black horses!!What a cool idea!! Mary
AWESOME……just that AWESOME
That maybe the coolist thing ever.. Great job
i just found your blog, and it’s WONDERFUL!!! please, if your still into Halloween consider checking out HauntSpace.com.
you will fit right in!
We too love Halloween. Headless Horseman has been my favorite character since i was a child. You did an outstanding job!
Very nice job guys! I am using some of your blog to help me create my 2009 costume. I am going for a full headless horseman costume with a nearly full sized horse. I don’t know how this is going to turn out but your page definately helped. Thank you again, and happy haunting.
^v^ Ryan \/
VV
hello from Ontario Canada:)
I just found your blog through the halloween forum. I too am building a life size horse. The Homestead Haunt was my first inspiration and then from there things have a way don’t they?:)
Your horse is gorgeous by the way. you have captured the true stance of a rearing horse. Good on ya!
I would love to know where you store yours, I think that is the most asked question by people. haha
I just tell them I am going to put antlers on it at christmas, bunny ears at easter etc…If you are intested in seeing mine (I have to say, it is turning out quite nicely) check it out on the halloween forum under lollypopholly
thanks for sharing, I love love love it!
It’s really amazing what you’re done here!
I just stumbled across a picture of your prop and it looks fantastic. I’m also looking to make teh Headless Horseman for next Halloween and had just one basic question. It’s been two years now since you made the horse, how have the materials been holding up and is the prop able to handle the water when it rains? And do you have any thoughts on how you would improve in how you made the horse that aren’t on your diary?
Thanks for any info-Paul
Nice job! Very impressive project from start to finish. That must have been very heavy to move. Thank you for sharing the great tutorial and pictures.
wow your holoween thingy is awsome like i dont even have words for lol
That is BOSS! I wish folks got into Halloween like that around here! Love it!
OMG that headless horseman is the best!!!!!
I have that low lying fogger as well, when I tried it outside using the “standard ice”, it was truly unsatisfactory, so I went to our local Winn Dixie supermarket and bought some DRY ICE to put in the low lying fogger. It worked perfectly and I did not have to let it sit long for reheating before expelling the fog that stayed at ground level.
So don’t use regular ice in it, it will disappate far too fast and won’t give very good results. From 6pm to 11pm I only had to refill my low lying fogger 3 times with Dry Ice, the previous year I had used regular ice and had to go out and buy 3 LARGE bags to keep the unit working and refill the chamber almost every 15-20 minutes.
So try dry ice in your low lying fogger next time, you might find it works out fairly well. (I live in Florida where it’s HOT and HUMID” so ice doesn’t last long outside, not regular ice, but the dry ice, it served me very well and I’ll use it again this year in my low lying fogger.
BTW: love the Headless Horseman and the horse. Outstanding job to both of you on it’s creation! I came across it (your site here) because I was looking to see if there were any pre-made props I could buy and modify and use with my LOR Controllers uding the Headless Horseman song that would be sequenced to my Halloween lights and props for this year (2010), but that one’s now on the back burner, maybe next year.
I just saw the pics of your Halloween decor from 2007 and I love them! You guys are soooooo good at this. Halloween is my favorite holiday hands down and I’m going to try your scarecrow idea. Love it! Keep up the goulish work! 🙂
My wife and I loved this horse as soon as we seen it. Our daughter rides , so we thought this would be a perfect addition to our haunt. It took us 3 weeks to do ( as I was on crutches) but the result was amazing.So many comments and pictures taken. Thank you for posting pics on your site(no, we don’t have one), we also used the scarecrow-pumpkinhead- idea.If you can get to my facebook page, I have lots of pics and a couple vids of thisyear (and past) haunts. Check for Michael or Mike Hardy, brighton, Ont. Canada. Profile pic is that of a sexy witch. Thanx again Mike
Very Very VERY cool Halloween decorations!!! My girlfriend (of over 2 years) and I are total Halloween nuts ourselves! We just began doing the same type of outdoor decore you’ve got going on, we went more of the animatronic way though. I’m not so much a wood worker or self-builder….yet. Any chance I (we) could find you both on facebook? We LOVE talking Halloween!
I know this blog is from many years ago and i hopeful you will still respond to this reply. We have been using your blog as our how to guide to create a horse of our own for halloween. We have run into a couple of small dilemmas. First, we believe the chicken wire used on the body may have been too loose and that maybe the gauge should have been more tight. What size did you use? Second, the monster mud and burlap seem to be too thick and heavy, how thick was yours. It looks like your burlap is laying very flat. You both did an awesome job on this horse. Thanks Gin 900secondslive.com
Hi there! I wish I could remember the gauge but can’t off the top of my head. It was some extremely heavy stuff though. It was difficult to clip and shape. The burlap has to be very taught on the frame. It’s not just flat, though that does matter for bumpy final looks but the burlap has to be attached really well all around and especially at the top, where it will be holding up the most weight of the monster mud. The monster mud was heavy! Thinner coats first to cover, the build up. It was good messy, messy fun! Thanks for your kind words!
Thanks for your quick reply Lacey. I think I will revisit the stomache of the horse and add a heavier gauge wire. Thanks for the inspiration. Will post pics when we are done.
Best,
Gin
Lacey: Exactly how long did it take to construct from beginning to end? My husband is very creative with wood working stuff, so this should be easy for him. I think his biggest concern is how and where to store it when season is over? Is it possible to make it in parts that can be assembled and disassembled? Do you have anything recent projects for all the Halloween buffs? Fabulous job! :)))))
Hello from Ft. Gordon, GA! I have to tell you that I absolutely LOVE what you were able to create!!!!! I was curious however as to how you created the “arms” for the scarecrow…..was your pvc pipe in a “T” shape or did you add something? I’m not very creative at all but I desperately would like to try to replicate your scarecrow for my 1st Halloween back in the states after being stationed in Germany for the last 3yrs. Thank you in advance for any guidance that you’re able to give me and HAPPY HALLOWEEN! =0
Hi Lacey,
Our Horseman is complete and we are very happy with the way it turned out. We plan on using dry ice on Halloween Night to add to the creep factor. Creating this monster drew a lot of interest from both my friends on fb and neighbors. Thank you both for being the inspiration behind this project. Without the guidance of your blog it may not have come together at all. Happy Halloween. Please friend me on fb if you would like. I would love to see other things you both create. Best, Gin B. Stop by my page to see how it turned out.https://www.facebook.com/gin.music
Anyone interested in selling me the life-size “completed” headlless rider?
I was so blown away by your creation that I had to lie down for awhile. Amazing!!!!
I love the headless horsemen. I really wish that I could make the horses head but I don’t know how to make the shapes out of chicken wire. Wish you could make a tutorial of how you did it.
Do you have any dimensions on this
Hi Lacey:
I exchanged messages with you back in 2009 and wondered if you still had the horse. I am redoing mine and was looking at images of ‘rearing horses” and saw one just like yours but it was from a guy in NY city. How is it holding up after 8 years?
Paul Stutts